What are photoshop actions and how to use them
Photoshop Actions. I know what you're thinking - “Another gimmick I don’t need to know about.” But trust me, once you understand these little gems, your editing life will be a whole lot easier.
I’ve been using and creating Photoshop Actions for around 10 years now. If you curate and set up a nice collection of actions that compliment your workflow as a photographer, the time savings are priceless - and as we all know ‘’time is money friend.’’
What exactly is a Photoshop Action?
Think of Photoshop Actions as little recordings that automate a series of editing steps into a clickable button. You would record a sequence of edits – like adjusting exposure, adding contrast, and maybe popping those colours – and then save it as an action.
Next time you have a photo that needs a similar look, you just hit play, and the action applies to magic for you!
It’s a bit like having a personal assistant inside of Photoshop.
Why should you bother with Photoshop Actions?
Time-saving: As mentioned the main benefit of actions, at least in my opinion are time savings, especially when it comes to super manual tasks, such as resizing or mass exporting.
Consistency: It’s hard to keep your editing style consistent across a whole shoot, let alone a whole year. Actions can help you maintain that valuable attention to detail.
Experimentation: Actions let you experiment without committing to hours of work. Maybe you want to quickly check what your image would look like with a nice border or a particular colour grade.
Editing Mode
Button mode
How to use Photoshop Actions
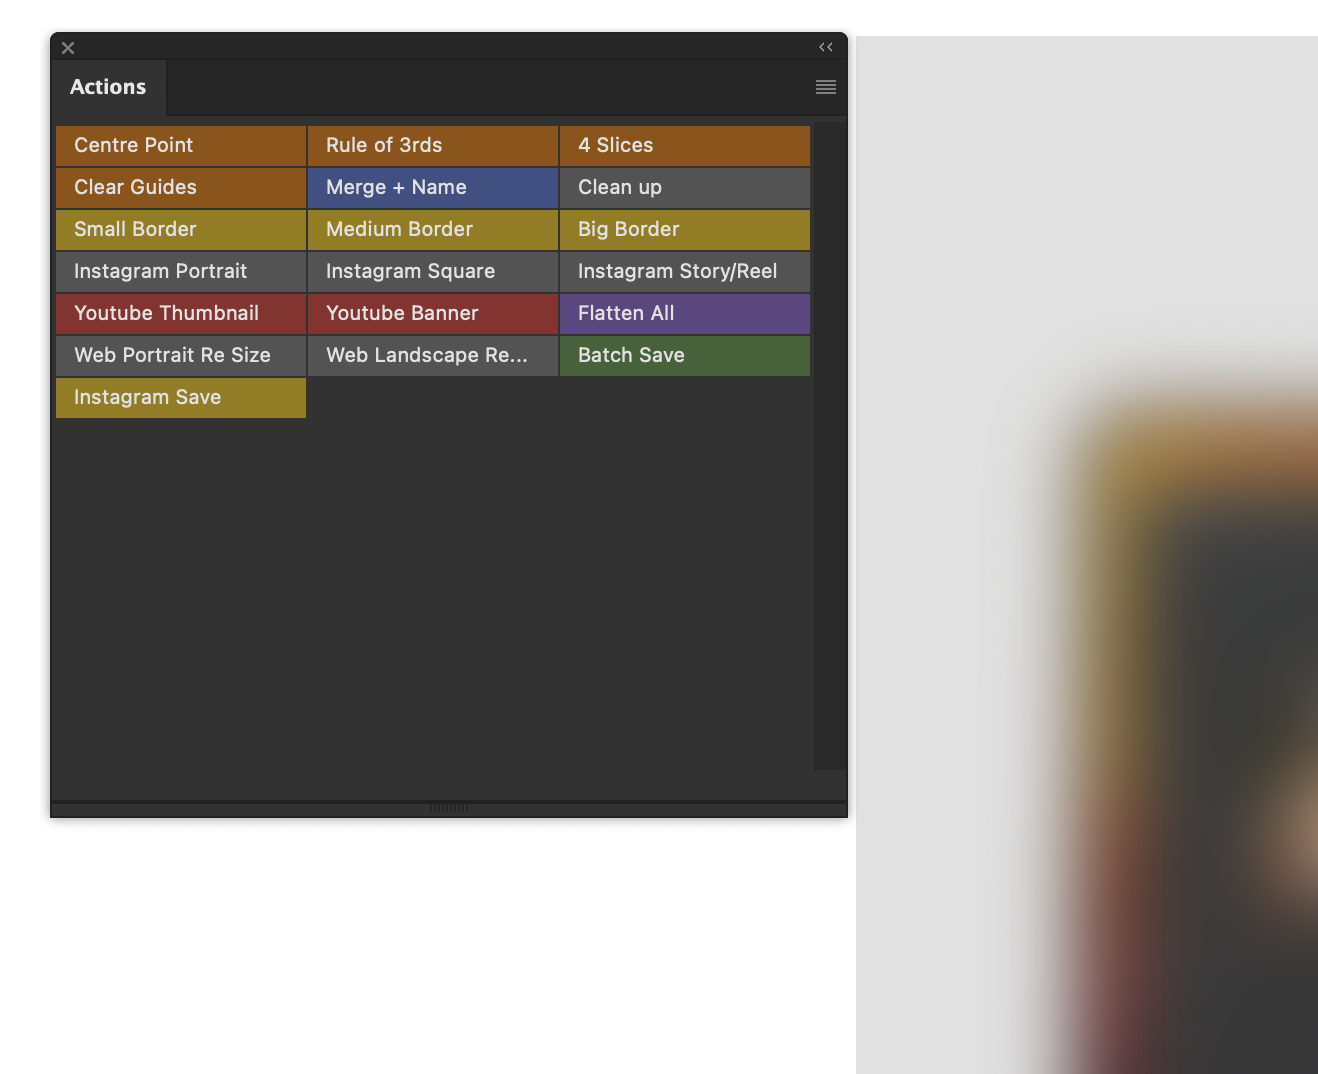
Using an action is super easy. If you don’t already have the actions panel open inside Photoshop, simply head to Window > Actions - and then place that window where ever you want. There are some default actions that come with Adobe Photoshop, I normally delete these and start fresh (but keep them if you think you’ll use them.)
The actions window has two modes, the editing mode and the button mode (pictured above) you can swap between the two modes via the 4 lines icon in the top right of the actions window. The editing mode is where you can record, edit, label and re arrange actions (you can run actions from here too via the play button if you wish) — but the button mode is what you want to swap back to once you’re happy with your actions, turning them into easily visible buttons.
If you have actions downloaded that you wish to import, you can drag and drop the saved action file into the actions window. Then with your photo open inside Photoshop, find the action you want in your Actions panel and click it to run it. It’s that simple!
Creating your own Photoshop Actions
You don't have to rely solely on pre-made actions. You can create your own! It’s pretty simple..
First make sure your actions window is on the editing view mode
Hit the plus button at the bottom of the actions window (next to the trash can icon) The will bring up the prompt to create a new action.
Give your action a name, assign a key bind if you wish, and label it with a colour allowing the finished action button to stand out.
Next press the record button (the little circular icon, just like a video camera)
From here you can begin your editing steps inside Photoshop. Click the stop button once you are done to save the steps as an action.
Switch back to the button mode view, and test your new action!
Where to find pre made Photoshop Actions
You can find actions all over the internet. There are free ones and paid ones. Just do a quick Google search for "Photoshop actions" and you'll find a ton of options. But remember if you’re using actions designed for ‘photo looks’ or specific edits on the photo itself, they are a lot like presets, they may need further tweaking, and may look different across a wide range of images.
I have my own action pack for sale which focuses on small but powerful enhancements to a photographers workflow. These are not one click edits or colour grades as I believe photographers should take pride in editing their images with their own style. Instead I have curated a pack of ‘helping hand’ actions (think guides and automated export options for social media) that simply make the photography editing process faster and more enjoyable for photographers.
You can check that action pack out via the shop here on my website if you’re interested in finding out more!
Tips for Using Photoshop Actions
In the know: I can’t stress this enough, make sure you fully understand what the actions is doing manually, so if a particular action stops working or fails for whatever reason, you are able to do the steps yourself in photoshop, or re record / fix the action.
Start with a good base image: If you’re using actions that effect the image itself, they will always work best on high res, well-exposed photos.
‘Workflow’ based actions: The best actions (in my humble opinion) are not ones that actually apply edits and effects to your photos, but ones that take long winded manual processes and turn them into a breeze. If there is something you do every time you’re in Photoshop such as add a white border around your image, then boom! make that an action!
Combinations: Sometimes steps you want to take in Photoshop are impossible to include in one single action, due to limitations within the programme itself. Creating multiple actions and running them one after the other is a great work around for this.
Save them somewhere safe: Always store your actions in a folder on your computer where they wont get deleted. Some actions (especially those that use separate scripts) will not work without the files on your computer. Plus theres nothing worse than spending hours creating valuable actions and then misplacing them along the way.
Final thoughts
Photoshop Actions are a game-changer. They save time, help you stay consistent, and let you experiment with different looks. They can seem quite scary at first, but so does Photoshop when you’re new to it. Don't be afraid to try them out. You might be surprised at how much you love them.
Remember, actions are a tool, not a replacement for your creativity or knowledge inside Photoshop. Use them to enhance your workflow and photos, not to hide behind a lack of Photoshop expertise.


